
In this tutorial, we will learn how to make a discord bot from scratch by just using JavaScript. We also aim to deploy it on the cloud to use it anytime without running it on a local machine.
I am sure you already know about the Discord app and are also familiar with discord bots. Discord is a messaging app that is primarily aimed at group messaging for communities.
What will we learn?
What do we need to know?
To build our app, we will be using a node module called discord.js.
Before starting to build the bot, we need to set up a discord server. Building a discord server is very easy. Just follow the steps I am showing you below, and your server will be ready in minutes.
Building the Discord Server
To use the discord bot, we need to have our discord server first. We cannot integrate a bot to someone else's server. In this article, we will create a basic Discord server. To build our server, we have to either go to the discord's official website, i.e., discord.com, or launch the discord app. I hope people who are reading this article already have an account. You can choose your preferred way of using discord from the official site. If you prefer to use the app, it is absolutely fine. I'll use the web version of discord.
After opening the app, click on the plus icon available at the bottom to add a server. You'll find multiple templates here. I am not going to use any template for this article. So, I'll choose Create My Own option. Now choose a name and click on Create. And our server is ready.
Registering App and Bot with Discord:
The next step here is to register our bot with discord. Visit this URL. Hopefully, you'll find the My Applications section empty. To register the bot, click on the New Application option available in the top right corner. Now give your application a name, and click on create.
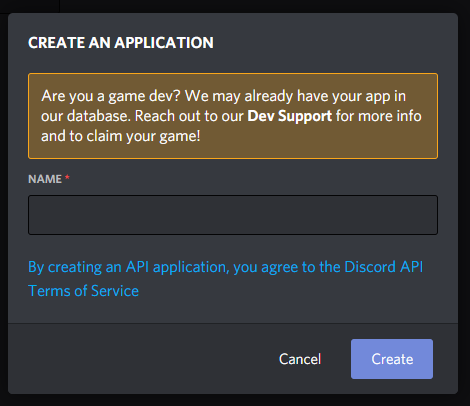
On the next screen, you will find the Bot's option on the left side of the menu. Click on it, and select the Add Bot option. A confirmation screen will pop up; click on Yes, Do It. The next screen will give you a token. This token is very important and should not be shared publicly.

Click on the Copy button to copy the Token. We will need it when we jump to the coding part.
After following all the above steps, we have registered our bot successfully.
Coding the Bot
Now, we will jump to building our bot. As I have mentioned, we will use a library called discord.js. The discord.js is a node.js module that makes the interaction with the Discord API very easy. So, to start writing some bot code, we have to initialize the NPM. The npm init -y will initialize NPM for the directory. After initializing NPM, we have to install two packages for our app. The first package is the dotenv package and the second one is the discord.js package. If you don’t know about the dotenv package, let me give you a basic context about it. It loads the environment variables from a file called .env into process.env. In easy words, we can initialize sensitive data into variables in a .env file, and those values can be loaded in the application by using the variables name with the process.env method without adding the data directly. You'll get a better idea when we use it.
To install the packages, we will run npm i dotenv discord.js. After the installation is complete, we will create two files:
The app.js file will contain all the code, and the .env file will have the token and other sensitive information.
Inside the .env file, we are creating a single variable called BOT_TOKEN, and the file will look like this,
BOT_TOKEN=Nzg2NDU3NTY5MzU4Nzc0Mjgz.X9GrsA.xxxxxxxxxxxxxxxxxxxxxxxxxxxx
Now, let’s start working with the app.js file. The first step in the app.js file is to require the important modules.
const Discord = require('discord.js');
require('dotenv').config();
In the first line, we require the discord.js file and in the second line, we are initializing the dotenv module. The dotenv module is initialized using the config() method. The config method can also take parameters. By default, dotenv searches for the .env file in the root directory. But in many cases, the file can be located inside other folders. In such cases, the folder location is passed as a parameter in the config() method. Though our file structure is simple, we are putting the .env file inside the root directory itself.
Now, somehow we have to establish a connection with discord. To connect with discord, the discord.js module gives us a constructor method. If you follow the documentation of discord.js, you’ll also find it there.
const client = new Discord.Client();
There is also a method called client.on. Using this method, we will be listening to an event called ready. This will essentially fire up when the connection with the discord server is ready. We can pass a function here.
For this example, we will use a simple function that only console logs ‘The Bot is Ready’ when the connection has been established. We are using arrow functions. One more important thing that we have to do here is to log in to our bot with the discord server. The method that will log in is the client.login method. Inside this method, we have to pass the token that we have got from the discord developer portal. I have previously mentioned that we will be using the dotenv package for sensitive information like this. We have already created our dotenv file. We have initialized the token with a variable already. Now, to use the variable inside the app.js file, we can use process.env.VARIABLE_NAME where the VARIABLE_NAME is the name of the variable that we have already initialized in the dotenv file. So, the login method will look like,
client.login(process.env.BOT_TOKEN);
To start our bot now, we will have to setup a script to run the code. To setup, we have to go to the package.json file. Inside the scripts tag, we have to add "start":"node app.js". Running node app.js or npm start will start the script now.

I also have setup a nodemon script here for auto-reloading the codes. You don't have to do this for this example. You can also delete the test script. Now, if you run your script, you'll find that the console logs the specified text. It means our bot has been successfully logged in with the discord server. Now, we can start messing with the bot functionalities.
The client.on method will now listen for the message event. When listening to the event, it will return an object. This object will have a key-value pair of content. This content will hold the message typed by the user.
client.on('message', (msg) => {
  if (msg.content === 'Hello') msg.reply('Hi');
});
Here is some basic interaction with the bot. We are listening to the message event. Whenever the content of the message is hello, we will reply to the user with Hi. Now, you have to restart your app. But till now, the bot is not connected to any server. Our next step is to connect the bot with the server that we have created before. To do this, First, we have to revisit the discord developer portal, click on the app name that has been initialized early. After the page opens, you’ll find an option called OAuth2 in the left menu.
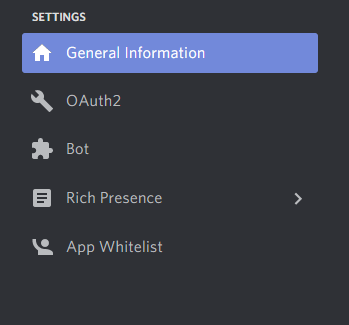
In the options under Scopes, you'll find a checkbox corresponding to the option bot, and we have to check it. Now, a link will be generated below the options.
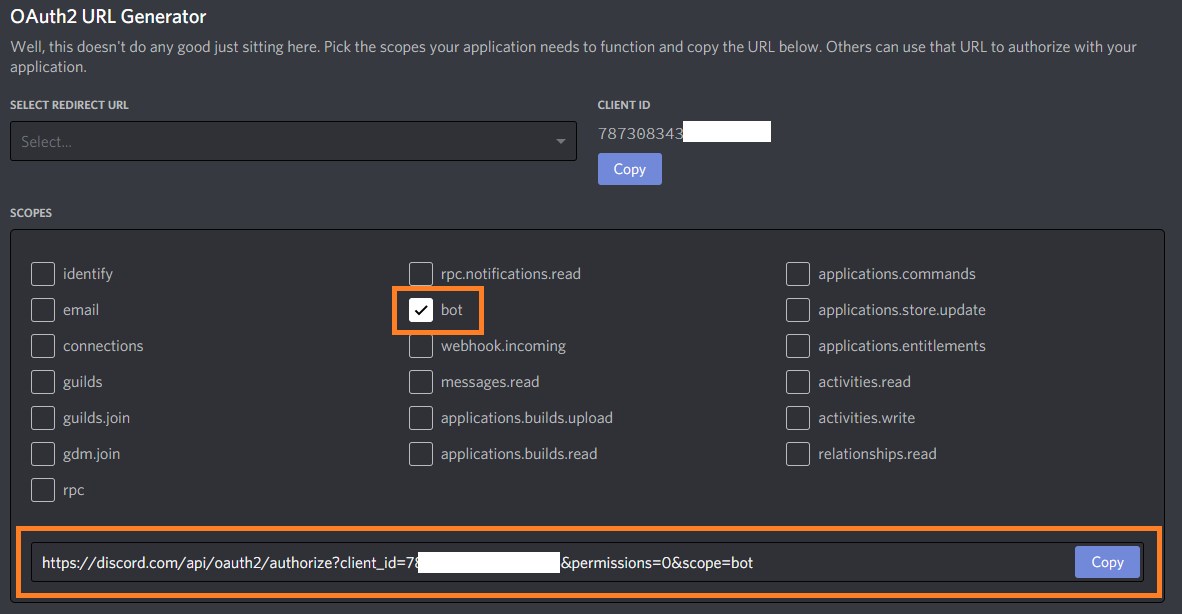
Copy the URL and paste it into a new tab. This page will ask you which server do you want to add to your bot. Select your server from the dropdown and click on authorize to authorize the bot with the selected server.
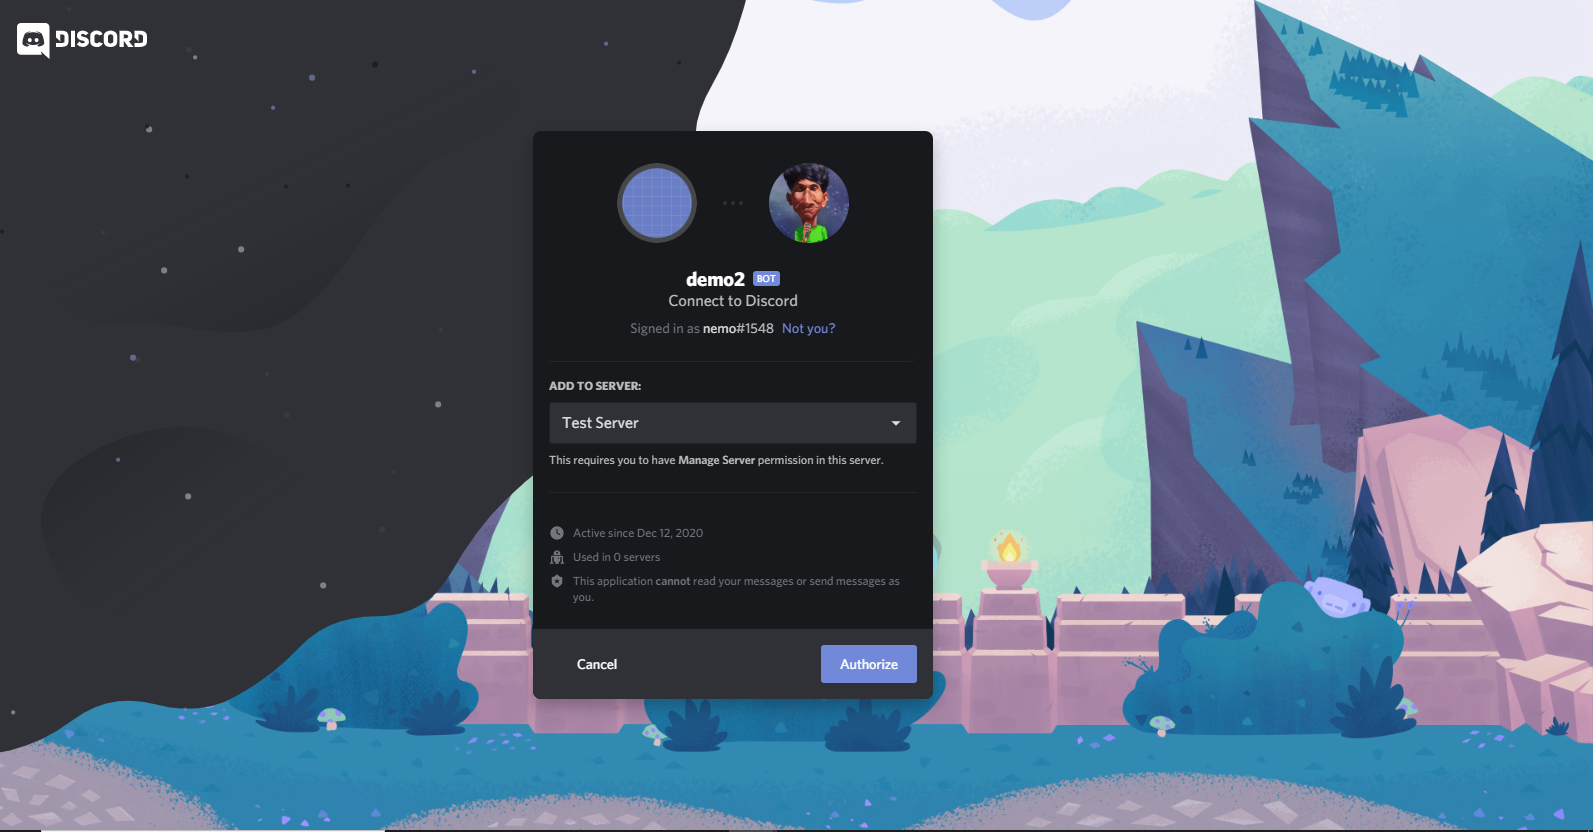
And the bot is now authorized with the server. Now, to test if our bot is working, just type in Hello, and you’ll see that the bot will reply with Hi.

So, our bot is working. Let's add some more functionalities to our bot.
Our bot will reply to us with a joke every time we send a command !joke. Usually, the bot commands start with some special characters to distinguish them from standard text. This is the reason behind adding the exclamation mark in front of the command. The logic is very simple behind creating this functionality. We will create an array of jokes. Every time the bot receives the command, it will generate a random number between the array length. And we will access the array element at the random array location.
Here is our jokes array,
// Jokes

const jokes = [
  "What rock group has four men that don't sing? Mount Rushmore.",
  "some joke...",
  "some joke..."
];
In the above array you can add as many jokes as you want.
And here is how we are going to generate a random array location,
jokes[Math.floor(Math.random() * jokes.length)]
We are generating a random number first within the array's length, then we are flooring the element, and finally, we access the element at the array position.
So, until this point our complete code will be like this,
const Discord = require('discord.js');
const client = new Discord.Client();
require('dotenv').config();

// Jokes
const jokes = [
  "What rock group has four men that don't sing? Mount Rushmore.",
  'When I was a kid, my mother told me I could be anyone I wanted to be. Turns out, identity theft is a crime.',
  'A guy goes to his doctor because he can see into the future. The doctor asks him,"How long have you suffered from that condition?" The guy tells him, "Since next Monday."',
  'What do sprinters eat before a race? Nothing, they fast!',
  'What concert costs just 45 cents? 50 Cent featuring Nickelback!',
  "What do you call a mac 'n' cheese that gets all up in your face? Too close for comfort food!",
  "Why couldn't the bicycle stand up by itself? It was two tired!",
  'Did you hear about the restaurant on the moon? Great food, no atmosphere!',
  'How many apples grow on a tree? All of them!',
  "Did you hear the rumor about butter? Well, I'm not going to spread it!",
  'I like telling Dad jokes. Sometimes he laughs!',
  'To whoever stole my copy of Microsoft Office, I will find you. You have my Word!',
  'q. How do you comfort a JavaScript bug? a. You console it',
  'When a JavaScript date has gone bad, "Don\'t call me, I\'ll callback you. I promise!"',
  'Dev1 saw a strange JavaScript function & asked, "What is this?". Dev2 responded, "I don\'t know. I would\'ve called you, but I was in a bind"',
  "q. Why was the JavaScript developer sad? a. Because he didn't Node how to Express himself",
  'q. Why did Jason cover himself with bubble wrap? a. Because he wanted to make a cross-domain JSONP request',
  "q. Why did the CoffeeScript developer keep getting lost? a. Because he couldn't find his source without a map",
  'q. Why did the developer go broke? a. Because he used up all his cache',
  'q. Why did the JavaScript boxer goto the chiropractor? a. Because his backbone was angular from a knockout and required attention',
];

client.on('ready', () => {
  console.log('Bot is ready');
});


client.on('message', (msg) => {
  if (msg.content === '!joke') {
    msg.reply(jokes[Math.floor(Math.random() * jokes.length)]);
  }
});

client.login(process.env.BOT_TOKEN);
Adding More Functionalities to our Bot
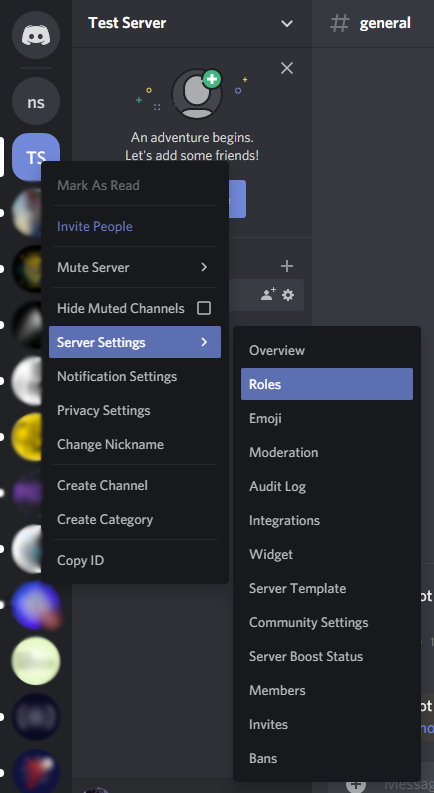
Now we have a working bot that will return a joke whenever it gets a particular command. But such a bot is not very useful. We will be taking our bot one step further. We will give our bot a special power to make moderators. By typing a particular command, a user can be promoted to a moderator role. Let's see how this can be done. The first step towards creating this functionality is to create a moderator user role. To create a new role, we have to right-click on our server name, hover over the server settings, and select the menu's roles option.
Now click on the small plus icon beside the Roles text.
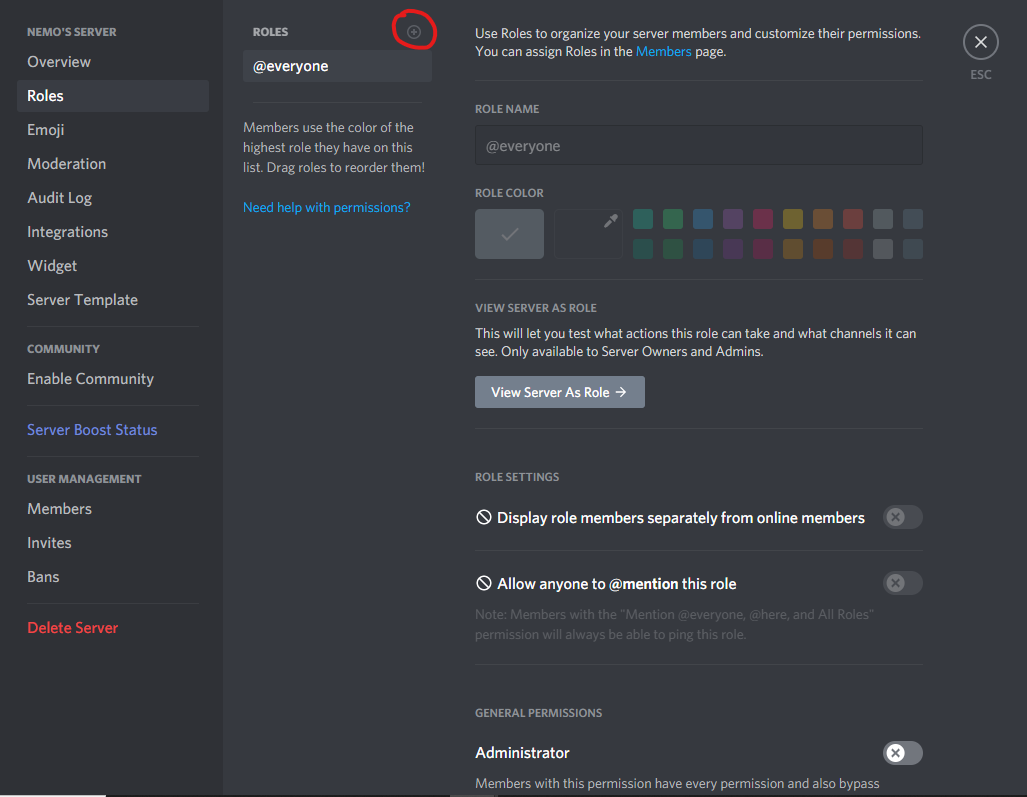
It will add a default role called new role. On the right side of it, you'll find options to customize the role. You can choose your own role name and other options that this role can manage. After you are done with creating the role, click on the save changes button. This will add the role to the server.
Now, we have to turn on another option in discord settings. In discord, everything has a unique ID. By default, you won't be able to see the IDs. To turn on the option, we have to go to the user settings, then Appearance, and at the end of the options available in the Appearance menu, you'll find an option called Developer Mode under the advanced settings. Turn it on.
We will be able to copy the IDs now. We will need the ID of the moderator role. To get it, head over to the server's roles section again, right-click on the moderator role and click on Copy ID. Replace your message event code with the codes pasted below.
client.on('message', (msg) => {
  if (msg.content === '!joke')
    msg.reply(jokes[Math.floor(Math.random() * jokes.length)]);
  if (msg.content === '!mod') {
    msg.member.roles.add('786492152485117962');
    msg.react('?');
    msg.reply('You are a MOD now');
  }
});
The first if section is already described before. Let's understand the second if section. We are checking if the text sent by the user is !mod. If it is, then we use the method called member.roles.add. This method takes the role ID as a parameter. Replace my ID with the ID you just copied. Remember, passing value names won't work. Discord only identifies something using its unique ID. And after the bot gives the moderator role to the user, we add a reply that says the user is mod now. The msg.react(‘?’) will react to the !mod command with a heart emoji. The reaction emoji is passed as an argument to the react method.
But our bot is still unable to give roles because it doesn't have permission to do so. If you run your code now, you'll face an error like below,

Follow the below steps to resolve the issue:
-
Open the discord developer portal again
-
Click on your app
-
Go to the OAuth2 option available on the right.
-
In the Bot Permissions section, select the Manage Roles option.
-
Copy the URL generated above
-
Paste it in a new tab
-
Select your server
-
Click on Continue
-
Make sure the ‘Manage Roles’ is checked and click on authorize
-
Complete the captcha

You can check the above gif for the mentioned steps. Now, if you open the roles section under your server settings, you'll find that you have a new role for the bot. One more thing that we have to do is to drag the bot role above the moderator role. In discord, a role can only manage the roles below it. So, just drag and drop the bot role above all other roles. Remember, this step is crucial. Otherwise, your bot won’t be able to give roles and will throw errors. And we are good to go.
Now, if you send the !mod command, you’ll be converted to a moderator. You can also check your role on the right side of the server.
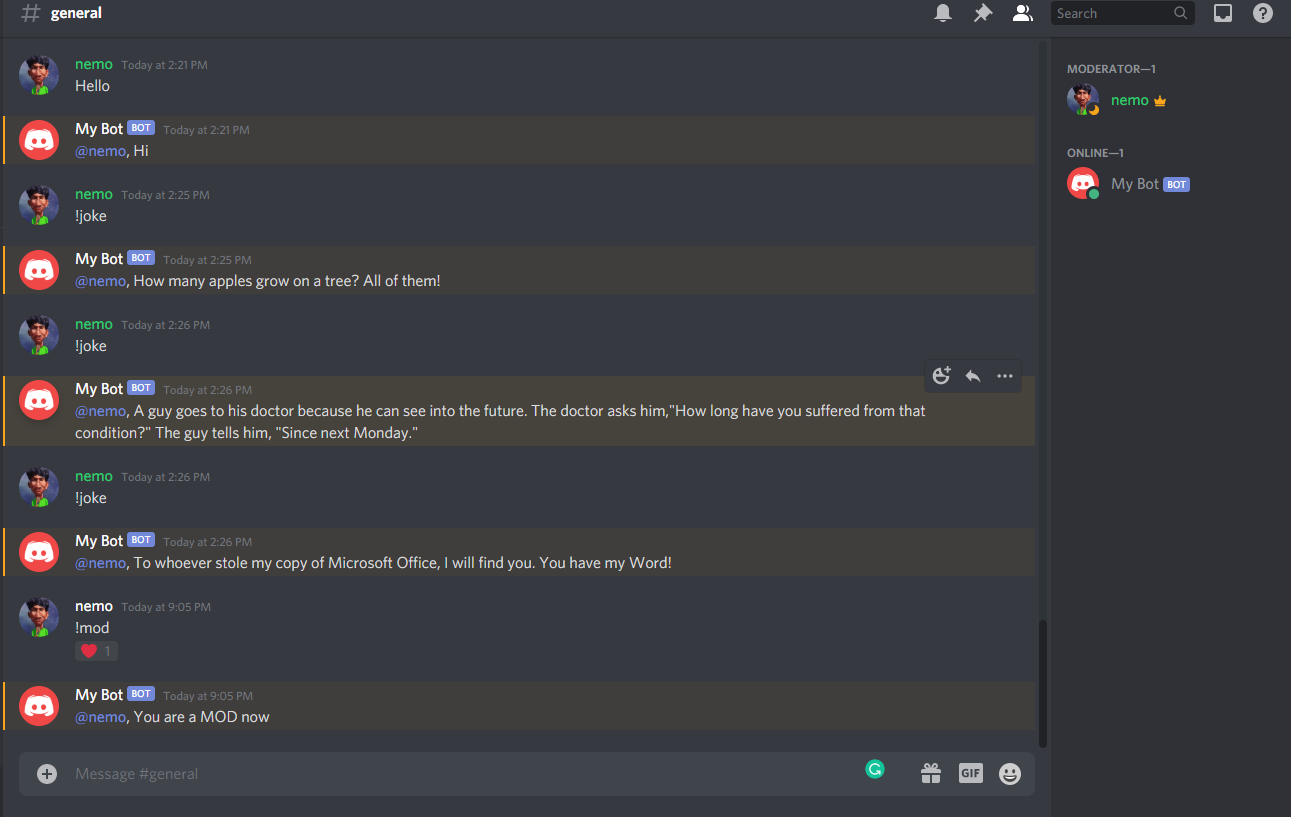
The complete app.js file will now look like this,
const Discord = require('discord.js');
const client = new Discord.Client();
require('dotenv').config();

// Jokes
const jokes = [
  "What rock group has four men that don't sing? Mount Rushmore.",
  'When I was a kid, my mother told me I could be anyone I wanted to be. Turns out, identity theft is a crime.',
  'A guy goes to his doctor because he can see into the future. The doctor asks him,"How long have you suffered from that condition?" The guy tells him, "Since next Monday."',
  'What do sprinters eat before a race? Nothing, they fast!',
  'What concert costs just 45 cents? 50 Cent featuring Nickelback!',
  "What do you call a mac 'n' cheese that gets all up in your face? Too close for comfort food!",
  "Why couldn't the bicycle stand up by itself? It was two tired!",
  'Did you hear about the restaurant on the moon? Great food, no atmosphere!',
  'How many apples grow on a tree? All of them!',
  "Did you hear the rumor about butter? Well, I'm not going to spread it!",
  'I like telling Dad jokes. Sometimes he laughs!',
  'To whoever stole my copy of Microsoft Office, I will find you. You have my Word!',
  'q. How do you comfort a JavaScript bug? a. You console it',
  'When a JavaScript date has gone bad, "Don\'t call me, I\'ll callback you. I promise!"',
  'Dev1 saw a strange JavaScript function & asked, "What is this?". Dev2 responded, "I don\'t know. I would\'ve called you, but I was in a bind"',
  "q. Why was the JavaScript developer sad? a. Because he didn't Node how to Express himself",
  'q. Why did Jason cover himself with bubble wrap? a. Because he wanted to make a cross-domain JSONP request',
  "q. Why did the CoffeeScript developer keep getting lost? a. Because he couldn't find his source without a map",
  'q. Why did the developer go broke? a. Because he used up all his cache',
  'q. Why did the JavaScript boxer goto the chiropractor? a. Because his backbone was angular from a knockout and required attention',
];

client.on('ready', () => {
  console.log('Bot is ready');
});

client.on('message', (msg) => {
  if (msg.content === '!joke')
    msg.reply(jokes[Math.floor(Math.random() * jokes.length)]);
  if (msg.content === '!mod') {
    msg.member.roles.add('786492152485117962');
    msg.react('?');
    msg.reply('You are a MOD now');
  }
});

client.login(process.env.BOT_TOKEN);
With this, we have completed creating a Discord Bot and in the next part of this tutorial, we will learn to deploy Discord Bot to Heroku.
Conclusion
I hope this article was interesting to you. This was a very basic bot created just to give you an idea about how it is done. You can follow the official documentation of discord.js to explore more possibilities.
If you liked the article or faced any problems while building it, leave a comment below. Also, the whole code is available in this Github repo.
You may also like: