This article is the second part of How to create Discord Bot in Javascript and then deploy the Discord bot on Heroku. So in this article we will cover the deployment part.
How to Deploy a Discord Bot to Heroku
To run our Discord bot without starting our local server, we will have to deploy it on some cloud service, so we will deploy it on Heroku Cloud service. We will be using the free plan provided by Heroku for this application. But to deploy, we have to upload our code to Github first. So, let’s initialize our project with git using the command
git init
Now, create two files in the root directory. The first one is the .gitignore file, and the second one is called Procfile. The .gitignore file will be used to ignore files from uploading to Github, and the Procfile will consist of settings specifically for Heroku. Inside the .gitignore file, add your node_modules folder, .env file. So, the .gitignore file will look like this,
.env
node_modules/
Now open the Procfile and add worker:node app.js in this file. Add your files to git repo using git add . and finally, commit locally using git commit -m “Message”. I hope you know the basics of Github. If not, check this awesome tutorial series. Upload your code to Github now. I won’t be describing how to do so here because it’ll make this article more lengthy. Once you are done uploading to Github, open heroku.com. Log in or create an account if you don't have one already.
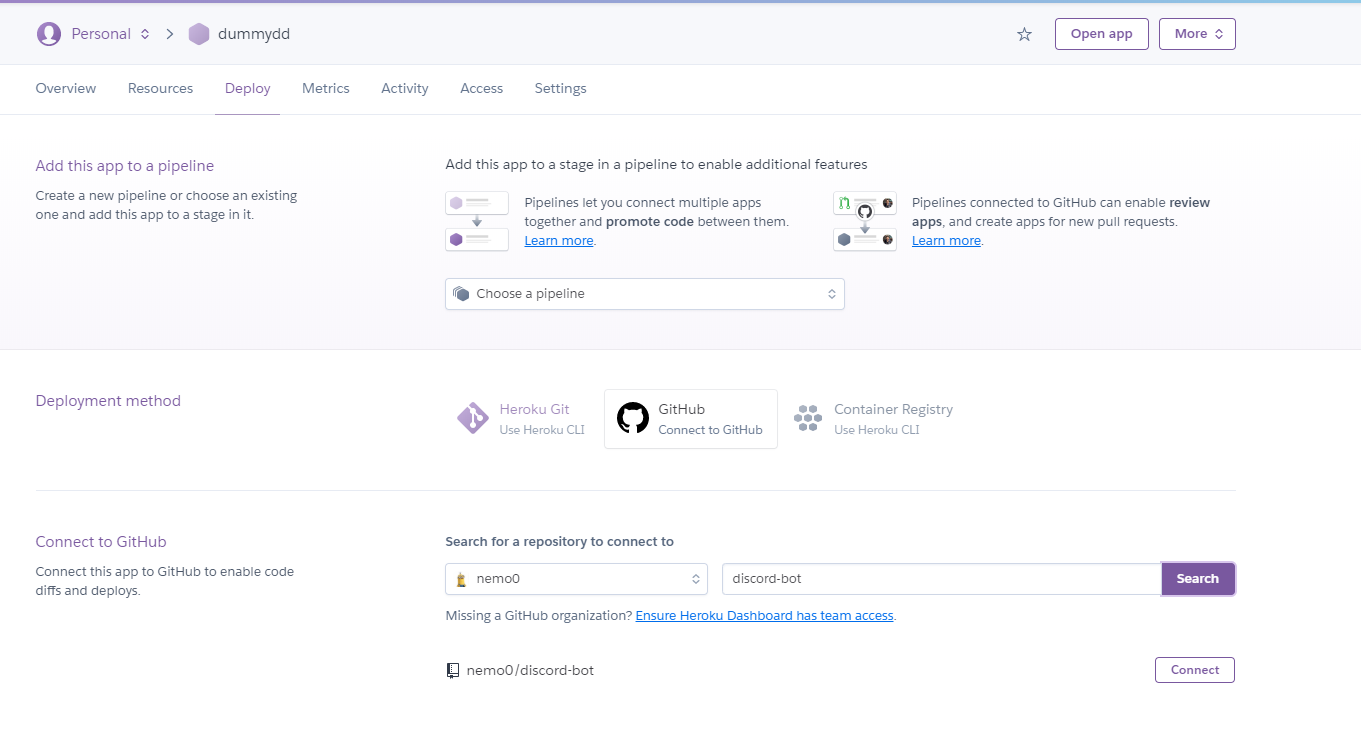
After logging in successfully, you’ll find an option called new in the top right corner. Click on the button, give your app a name, and click on Create app. Once your app is created, you’ll find an option called the Deployment method in the app dashboard section. Choose Github from here. It’ll ask you to search for the repo. Type your Github repo name and search it. Once it finds the repo, click on connect.

Once you click the connect button, it’ll ask you which branch you want to deploy. In most cases, the branch is either master or main. Select your branch and click on Enable Automatic Deploy.
You might remember that we haven’t pushed the .env file to our Github repo. So, how do we access the token provided by discord? In Heroku, it is pretty easy to add environment variables. Just follow the steps,
-
Click on Settings under your app dashboard.
-
Click on Reveal Config Vars.
-
You’ll see that it opens a form with two options, one for Key and the other for value; enter your Key name the same as you mentioned in the .env file and paste the value in the Value section.
-
Click on Add.
And, we have successfully added our environment variables to your Heroku app.
But our app is not yet deployed to the server. To deploy the app, go to the deploy section in the menu, and at the bottom, you’ll find the option for manual deployment. Click on it, and our app will be deployed to Heroku.
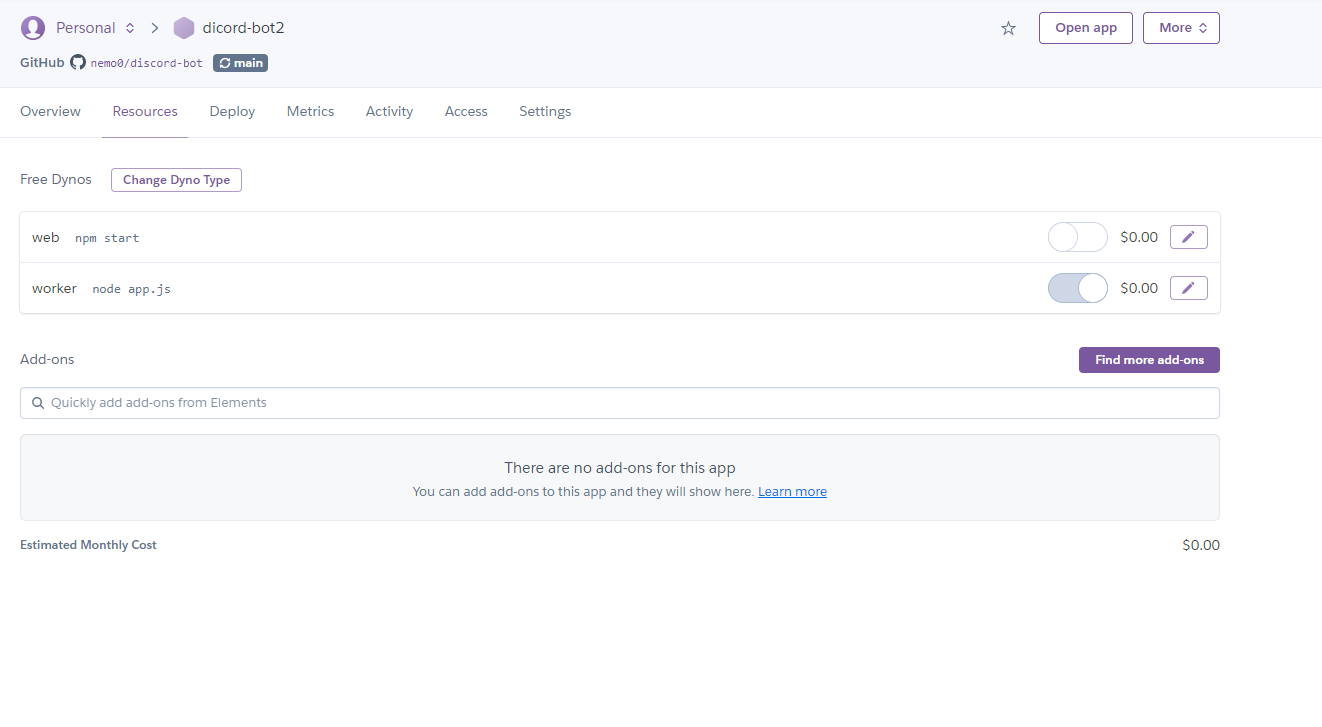
Just one last step is left in creating our app. In many cases, you may encounter a 60-second crash error. To resolve it, go to the resources option available on the app menu first.
You’ll see an option called web npm start. Turn this option off, and now turn on the option below it, which is saying worker node app.js.

And we are done. We have successfully deployed our app to Heroku. You can now test your bot even without running the npm start script in your terminal.
Conclusion
So in this two-part series, you learned how to develop a basic Discord Bot using Javascript and then deploy it on Heroku.
Deploying your Discord bot to Heroku opens up a world of possibilities, ensuring its continuous availability and seamless integration with your Discord server. By following the deployment process outlined in this article, you can easily host your bot on Heroku and leverage its robust infrastructure.
From managing resources to scaling your bot as needed, Heroku provides the reliability and scalability required for a seamless Discord bot experience.
If you have any confusion or faced any issue, please share in the comment section below.
Frequently Asked Questions(FAQs)
1. What is Heroku?
Heroku is a cloud platform that simplifies the deployment and management of applications. It supports various programming languages and offers scalability, reliability, and ease of use, making it an excellent choice for hosting Discord bots.
2. Why should I deploy my Discord bot to Heroku?
Deploying your Discord bot to Heroku ensures continuous availability and reliable hosting. Heroku's infrastructure takes care of server management and scalability, allowing your bot to handle increased traffic and stay online 24/7.
3. What is the process of deploying a Discord bot to Heroku?
The process involves creating a Heroku account, setting up a new Heroku application, connecting your GitHub repository or deploying directly from your local machine, configuring the necessary environment variables, and deploying your bot using the Heroku CLI or the Heroku Dashboard.
4. Can I scale my Discord bot on Heroku?
Yes, Heroku allows you to easily scale your Discord bot based on your needs. You can scale the number of dynos (containers) to handle increased traffic or utilize Heroku's autoscaling feature to automatically adjust resources based on demand.
5. Is Heroku free to use for deploying Discord bots?
Heroku offers both free and paid tiers. While the free tier provides a limited amount of dyno hours and resources, it is suitable for small-scale or hobby projects. For larger bots with higher traffic or resource requirements, upgrading to a paid tier may be necessary.
You may also like: